Connect to TVersity – Advanced Connection
Below are some instructions for users getting started with TVersity while trying to configure Connect to TVersity for the first time using a dynamic ip address and domain name. This will allow you to configure TVersity to work over the internet from anywhere (even your PC at work).
Disclaimer: This requires more advanced knowledge and might be too difficult for some users.
User level: Medium to Hard
Limitations: Must have access to router. Uses public internet (slower/less reliable). May have internet fees.
Benefits: Use from anywhere. Works over Bridge and Tether. You will have a Domain Name (free). You can use the same type of customizations to access VNC/Minecraft Servers/Etc.
Setting Up TVersity
Step 1: Download TVersity Server and install it on your PC. This acts as the communication ‘hub’.
Download 1.9.7 Free Server here for PlayBook Application Users
OR, Download 1.9.6 Free Server here for PlayBook Application Users
OR, Download Older Free Servers here for PlayBook Application Users
Step 2: Install TVersity onto your PC
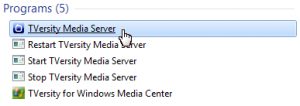
Step 3: Launch TVersity Media Server (shown above)
Step 4: Press Settings – you usually want to configure your Server for the first time.
Step 5: Change this port if you want to. If you change it, you need to restart the TVersity Service. Either way, write this port down. This is the port you will use in TVersity. I usually use 9999 because its easier to remember.
Note: While here, scroll down to HTTP Proxy and make sure it is checked.
Step 6: Make sure you enable outside network requests (so you can connect from work). For security reasons you absolutely should set a username and password.
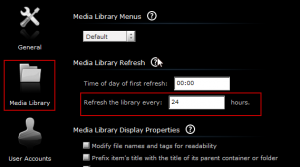
Step 7: Optional: Access Media Library and set how often you want the library to update. This makes it so that the TVersity server updates its list of movies every day, so you don’t have to. Usually I set this to 4 hours. Now for the fun part.
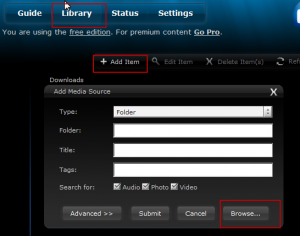
Step 8: Now we can go to the Library tab and start adding movie folders. You only need to add the root folder, it will automatically add any subfolders. I recommend adding your local movie storage (wherever you store your big movie list), I recommend adding your music list, I recommend adding your local photos, and I recommend adding your downloads folder. This makes sure you can access your Music, Movies and Photos from inside your PlayBook.
For those about to ask, you can find your iTunes folder by looking here.
Step 9: Press Refresh Items to build your video/music/photos list. This can take a while.
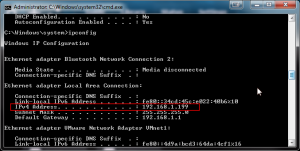
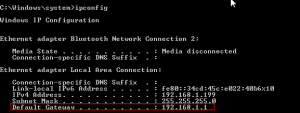
Step 10: Find the local IP Address of your system (not your external IP address). You can do this by using Start > Cmd > ipconfig /all, more information on this process here. Write this number down, this is your local IP connection and is needed for the next step(s).
Note: If you have an XBox 360, PlayStation 2, or Wii you can now access this media onto those devices as well. However, you need to use a different method for the Wii.
Configuring your Router
Step 1: Access the PC with the TVersity Server running on it. Use Start > Run > CMD again to launch a command window, and use IPCONFIG to view the network connection details. Look for the Gateway (usually 192.168.0.1 or 192.168.1.1). This is also usually written on your router.
Note: If you can’t find this url you may need to consult the manufacturer of your router, your internet provider, or your best know-it-all friend google. Each brand of router is slightly different.
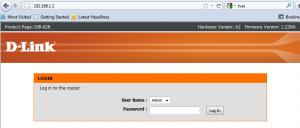
Step 2: Enter that IP / URL into the browser of the PC running TVersity. You should be able to access the backend of your router. Tip: Some companies (like Telus) lock this information from you and you need to contact them for the username/password. But generally you should find it written on the router itself.
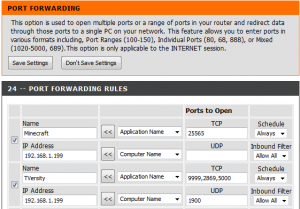
Step 3: Find the section that says Port Forwarding. Usually it is under Advanced. In my example above, you can see I already have my TVersity customized and a Minecraft server setup.
Step 4: Add the following TCP ports that Port Forward to the IP/PC running TVersity from earlier. [YourPort],2869,5000 TCP and 1900 UDP. YourPort is the critical one here. Make sure it is enabled and press OK.
Now, anytime a packet comes in on that port to your network, it should auto-forward to your TVersity PC to process.
Step 5: Verifying. Use this url and type in your TVersity port to make sure it is open. If it isn’t, consider examining your network. Chances are, your router is connected to a modem and that modem also needs to have these ports forwarded.
Verifying your TVersity Server
You can verify that your TVersity Server is working by opening up a browser on another PC outside your network (call a friend!) and launching a web-browser. Next type in: http://<your_domain>:<port>. Where the domain and Port were found above. You should successfully connect.
Optional: Using a Domain Name with a Dynamic IP for Free
This can be quite handy. This way, if your IP changes (most do!) you don’t need to worry about it. Moreover you can directly access your PC using a domain name and even setup your own servers. This is called a Fully Qualified Domain Name and is what we will be using in this part.
Step 1: Decide, do you want to use a Domain Name or an IP address? If you are comfortable with an IP skip all of this and use your public IP (you need to view it outside of your PC from somewhere like here).
Assuming you are wanting a DNS, we will use DynDNS.co wow, looks like DynDNS is no longer free. Lets go with ChangeIP.com.
Step 2: Sign-up for your free Domain Name here. Or go with the competitor here.
Step 3: Authenticate the account, and download the Dynamic IP updater. Run the software on your PC to automatically update your IP address. For more information on this process, visit here.
Step 4: Verifying it works. On your PC, type in: Start > Run > CMD. Type in TRACERT (your domain). It should trace itself to the External IP of your network as found earlier.
Configuring your PlayBook
Now for the easy part!
Step 1: Download Connect to TVersity onto your PlayBook
Alternatively you can use the stock browser to connect using URL http://<your_domain>:<port>/flashlib. Example: http://mydomain.dyndns.com:41952/flashlib. However you will make some trade-offs with the stock browser. You will see some problems when trying to browse movies due to how the touch is handled by the stock browser, etc. But, this is a viable free option for using TVersity.
Step 2: Launch the Connect to TVersity app, it should detect that you have not configured the software. Swipe down from the top of your bezel to launch the configuration screen.
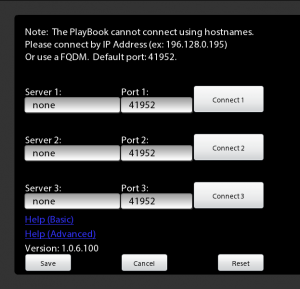
Step 2: Instead of connecting by IP address, enter your DynDNS Domain Name and Port you used in the first part OR use the external IP address to your PC and the Port. Press Connect<ServerID>. And the TVersity Connector will try to connect to your PlayBook externally to your network.
If you encounter connection issues beyond this point, thorough examination of your networking configuration may be required. It is recommended you contact me directly or leave messages on the forums for one-on-one help.
~ed




So this is all amazing in theory, however not in practice. I am running (in Canada) a Bell Fiber Op speedstream router, and although I can access the router’s wizard, it has none of the same options as described here. It seems to split port forwarding and application options into two separate titles. I also am unable to enter more than one port in either of them, just starting and ending port. So yeah, um. Help?! 😀
You bet, options are going to be different for everyone depending on the router! Its fine if it splits them up, Port Forwarding is what you need to use. Think of it this way, if you try to talk to you computer from work using port 80 – you do this by sending a message to the Router on port 80. If it doesn’t recognize you or know in advance what to do with it – its going to ignore you or say no-way. So, we need to go into the router and say hey, if you see a package using port 80, send it to the main computer. It knows what to do with it. In your case, look for an example screen. Sometimes you can add more columns (Etc). But really, if you can only forward one port (sometimes you can include them in commas, i.e. 80,8080,9070,etc) just use the master one you customized (9999 for example) and ignore the others. The others just make it easier on your network.
Ok
All good ok
Hey Lloyd, I was really excited to see your tutorial and have tried, tried and tried again to make it work for me. I was wondering if you would be able to give me an idea of what I’m doing wrong. I’ve followed your directions and the only different thing that I’ve had to face was my router. I’m using a Bipac 7300n router and the port mapping section looks a little different. This is what it contains and in brackets is what I have it set to: application (TVersity), Protocol (TCP), External Port (9999)~(9999), internal ip address (192.168.1.3), internal port (left blank), Time Schedule (always on). I have added more for each port number listed in your instructions. I’ve tried a few variations such as setting the port number as an internal port and leaving the external port blank but it requires an external port, have tried setting both internal and external to 9999, again no luck. Is it possible for a anti-virus program such as sophos would be blocking the connection? Am I just doing something small wrong? Any feedback would be amazing!! Thanks, Dan
Hi Dan, It certainly can do that. Basically, you need several things… 1) The Media Software needs to be configured to use a specific port 2) Your Router needs to be told what PC to send that port to when your outside your home 3) Your PlayBook needs to be told what port to use 4) Your PC needs to allow that port as well (Firewall and Antivirus can block it) I’m hoping to do a big update after BB10 launches that should some people with Media Connect / Connect to TVersity ! Lloyd
I’ll right away take hold of your rss feed as I can not find your e-mail subscription hyperlink or newsletter service. Do you have any? Kindly allow me recognise in order that I may subscribe. Thanks.
I am curious to find out what blog system you happen to be working with? I’m having some small security issues with my latest blog and I’d like to find something more secure. Do you have any suggestions?
WordPress + cloud flare + captcha + a few spam filters on WordPress side Make sure WordPress is up to date. Finally make sure to approve all posts – not to control content but filter spam
I am not able to stream my videos remotely or locally, If I am trying remotely it prompts me to download the content, I am using FireFox on the computer and a smart TV box adapter remotely on a TV, if I use IE it brings up my video and starts to buffer but then never plays just sits and buffers, on some videos others will prompt me to download, the same thing happens when I try locally too. I have tried to download a Codecs pack which seemed to help a little bit locally but not remotely. Thank you in advanced for all help!
Oh and I am using Tversity basic edition 2.6