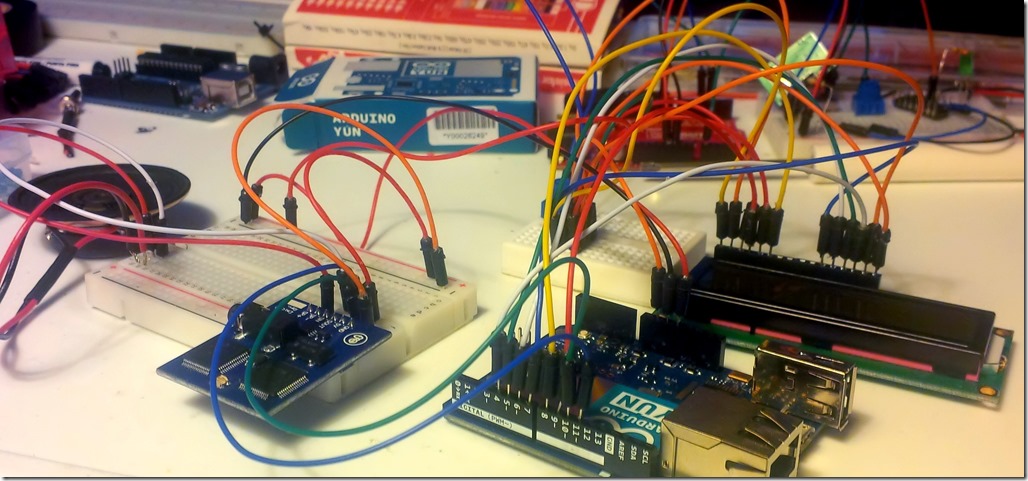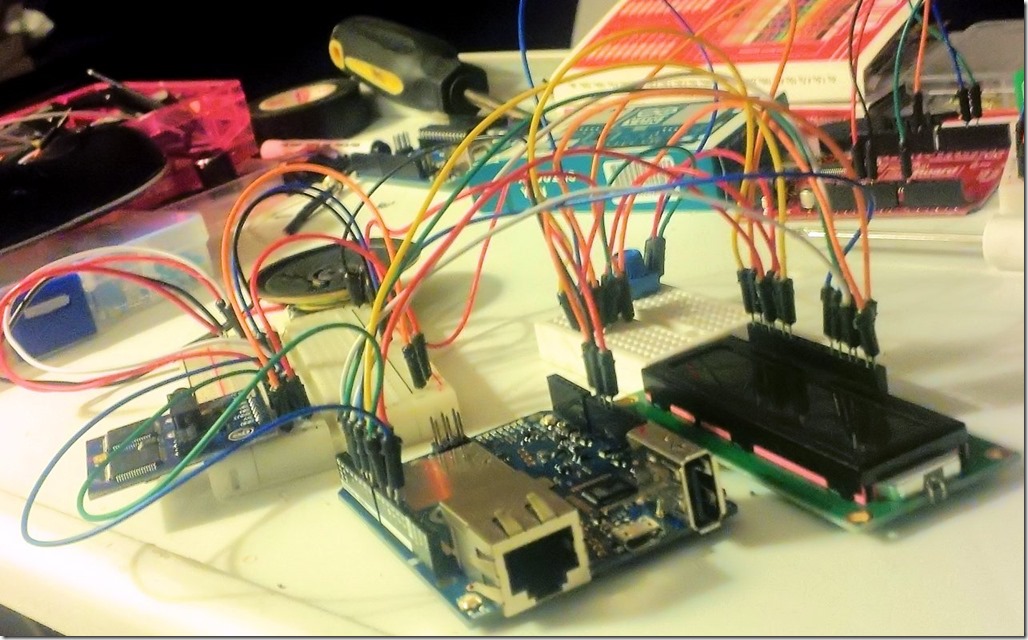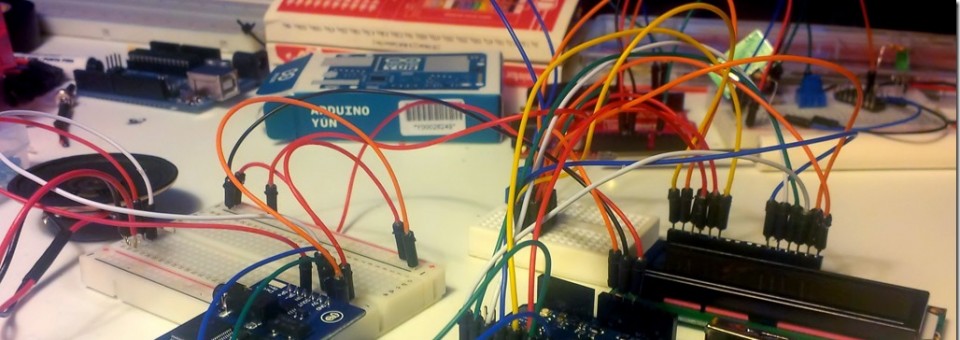
After recently getting an Arduino Yun from Newark Canada, I decided to put together a fun build video for IoT fans out there! This video will show you how to build your own Arduino Tweet Box using an Adruino Yun and an EMIC2. For fun, I decided to add a 2 line LCD as well (for folks who don’t have an EMIC2 or found it to be too pricy).
What will it do? Well, we are going to use an Arduino Yun to access Wi-Fi, this way we can bring the box anywhere we want to go. We are going to leverage the Temboo service – which means we can add RSS feeds, Facebook, and so on (although in this article I will only cover Twitter). And we will set it up to read your tweets out load and to check for tweets every 60 seconds!
Parts List
The following parts are available from Newark Canada:
- Note: If you wish, you can also add an amplifier to the speaker to make it louder if you want
Assembling the Hardware
The trick for me was to assemble and test the hardware one piece at a time.
Freebie: Grab my hacked-together Fritzing part for the EMIC 2 from here.
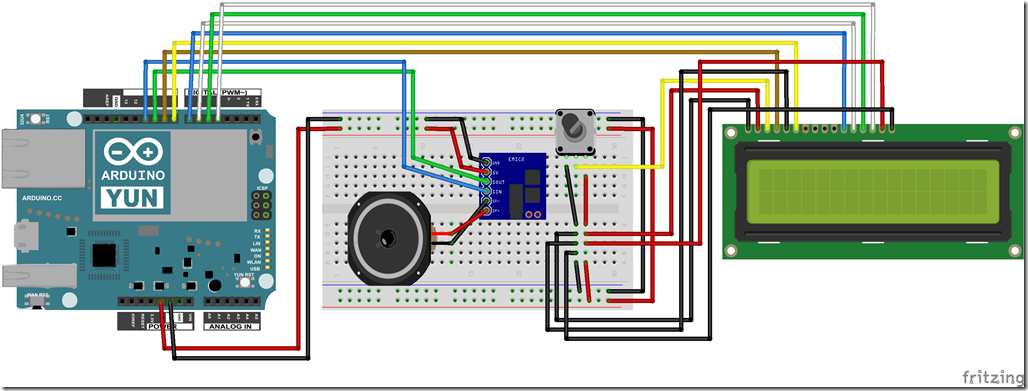
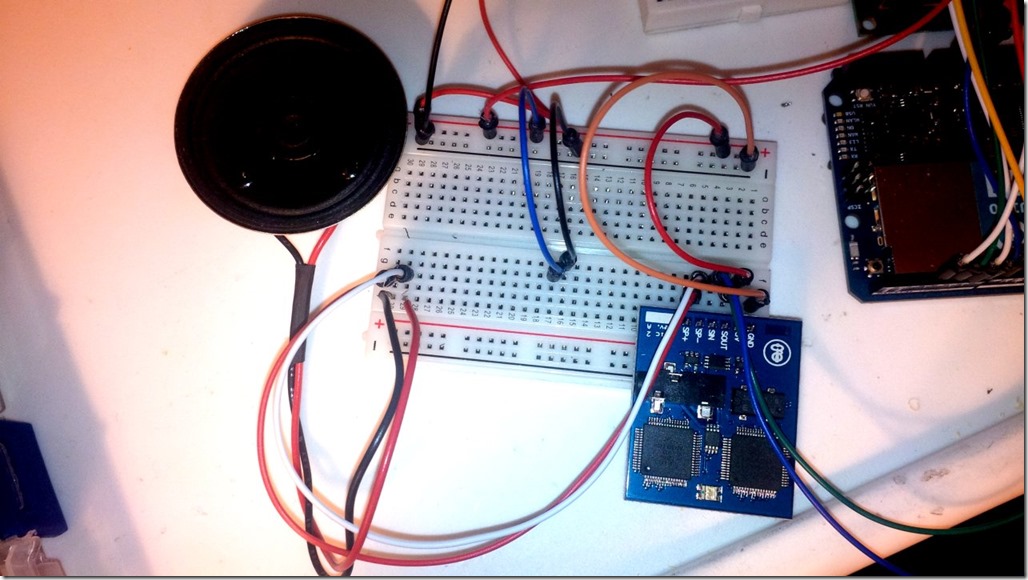
- Step 1: Run your 5V and GND cables to your breadboard
- Step 2: Add your EMIC 2 to the Breadboard and add your Speaker
- Step 3: Connect your Power + GND to the EMIC 2
- Step 4: Connect your Speaker to the SPK- and SPK+ on the EMIC2
- Step 5: Connect the SOUT to PIN 10 and SIN to PIN 9
You can now use SoftwareSerial to make the EMIC 2 read out loud using text! But what if you don’t have an EMIC 2? Well, lets also add an LCD and a trimpot to fade the brightness on and off!
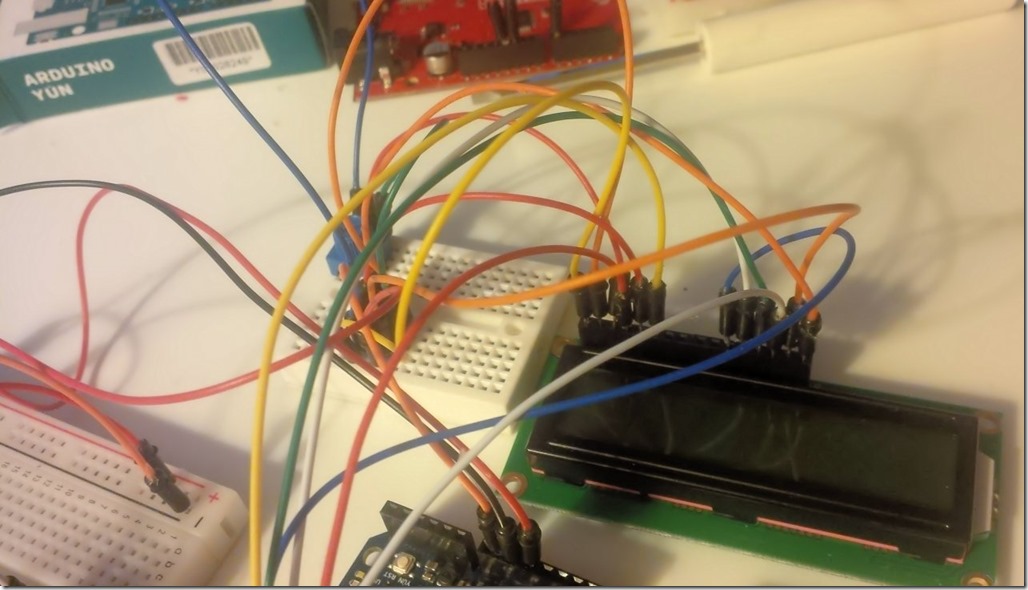
- Step 1: Add your Trimpot to your Board
- Step 2: Trimpot PIN1 to GND, PIN2 to 5V+, PIN3 to LCD PIN3 *** this will be used to fade the brightness
- Step 3: LCD PIN1 to 5V, LCD PIN2 to GND…
… think we’ve connected enough GND and 5V to the LCD? Oh no,
- Step 4: LCD PIN5 and LCD PIN16 to GND
- Step 5: LCD PIN15 to 5V
Whew, OK, now we can add the PIN’s we will use to actually control the display using the LCD LiquidCrystal library. And yes using the LCD and EMIC2 together leaves very little room for variables. The next section, we will simply be connecting them in series across the arduino pins.
- Step 6: Connect the following in order:
- LCD PIN 4 to Arduino PIN 9
- LCD PIN 6 to Arduino PIN 8
- LCD PIN 11 to Arduino PIN 7
- LCD PIN 12 to Arduino PIN 6
- LCD PIN 13 to Arduino PIN 5
- LCD PIN 14 to Arduino PIN 4
- Tip: You can use a Shift register to drastically reduce these if you need to
All done! Without adding a line of code, go ahead and plug it in. You should see the trimpot control the backlight display of the LCD.
Temboo Account Creation & Twitter Setup
OK time for some fun. To pull data from Twitter, we need to use an inbetween service (courtesy of Temboo who provides great customer service if you get stuck by the way). And by enabling application level access to Twitter.
Creating a Temboo account
- Sign up for a Temboo account for free: https://www.temboo.com/signup, please note you will need to activate this account so a valid email is a must.
- Log into your Temboo account https://www.temboo.com/login
- Select Arduino, then Arduino Yun (or another board if you are using an ethernet module)
- Now you will need some authentication information for your application in a header (TembooAccount.h) from https://www.temboo.com/account/applications/
That’s it! Temboo is done.
Setting up Application Access on Twitter
Please note: The landing portal is http://developer.twitter.com.
- Go to the following URL https://apps.twitter.com/app/new
- You will need to log into Twitter with the account you want to monitor
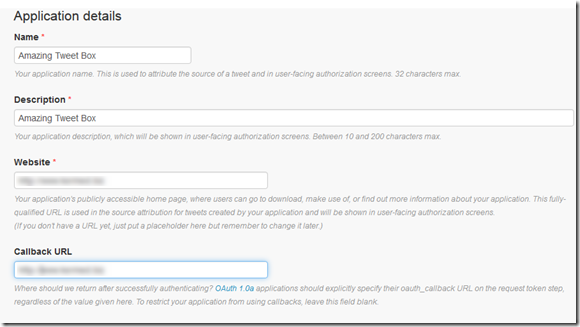
- Enter your application details as shown above (none of this matters much, including your callback URL)
- Name: Amazing Tweet Box
- Description: Amazing Arduino Tweet Box
- Website: (you should put the public IP for your Arduino Yun)
- Callback URL: (just put whatever)
- Agree, and create your application
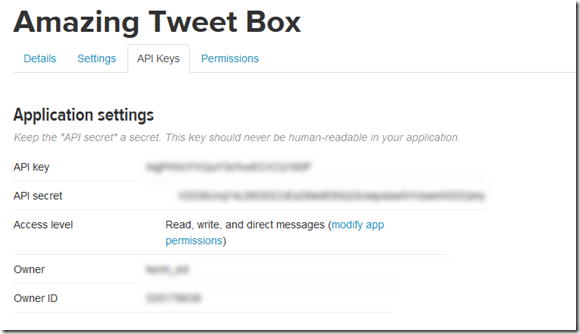
- Select the API Keys tab
Do not share this information with anyone. In my case, I also increased the access level so that I could not only read tweets (but create them).
The important part that you want to record, are the two fuzzy sections above. This is the application token and ID, however, we also need an Access token and ID! So
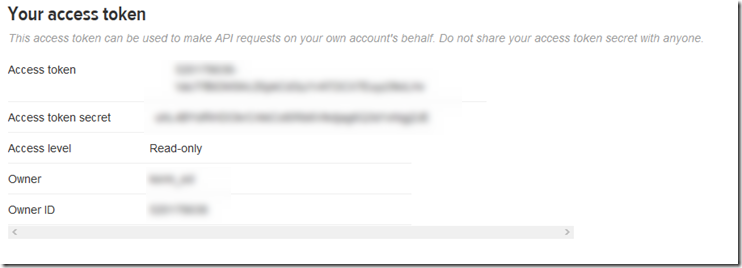
- Scroll down and press Create Access Token.
This is actually true, it does take a few moments to generate. In fact it can take up to a minute. So press refresh a few times until you see a second section below with even more credentials that you want to share with no one:
Alright! We now have the information we need to setup the Arduino.
Configuring the Code
Now, before you go uploading this code – I need to mention a few things.
First, long tweets won’t work because the Arduino will run out of memory. You can optimize the code below, add functions to reduce the tweet size, move the configuration file to the Arduino’s SD Card, or even remove the LCD code if you want. If you really want to be inspirational, you can use a cheap mini-Arduino such as a Bladuino or Arduino Mini to run the LCD, and communicate between the two using … SoftwareSerial! For now though, I want to keep the effort as clear as possible, so this will be a straight forward shot.
Second, you need to add your API tokens. And you need to add them in two separate spots. These will be blurred out below, but it means for some people this may be the first time you need to use an Arduino header file. If you download the sample package, it will do this for you. Otherwise you need to open the Arduino IDE, select Sketch > Show Sketch Folder. And create a text file called “TembooAccount.h”. You will then need to save up, close Arduino, and re-open to ensure it picks up the file.
TembooAccount.h
#define TEMBOO_ACCOUNT "your_user_name"              // your Temboo account name
#define TEMBOO_APP_KEY_NAME "your_temboo_app_name"   // your Temboo app key name
#define TEMBOO_APP_KEY  "your_gibberish_temboo_key"  // your Temboo app key
TwitterEMIC.ino
// Included libraries
#include <SoftwareSerial.h>
#include <LiquidCrystal.h>
#include <Bridge.h>
#include <Temboo.h>

// --------------------------------------------------------------------------------------------------------
// Things you need to edit...
// --------------------------------------------------------------------------------------------------------
#include "TembooAccount.h" // contains Temboo account information *** YOU WILL NEED TO EDIT THIS FILE ***

/*** SUBSTITUTE YOUR VALUES BELOW: ***/
// Note that for additional security and reusability, you could
// use #define statements to specify these values in a .h file.
const String TWITTER_ACCESS_TOKEN = "your_gibberish_twitter_access_token";
const String TWITTER_ACCESS_TOKEN_SECRET = "your_gibberish_twitter_access_secret";
const String TWITTER_API_KEY = "your_gibberish_twitter_api_key";
const String TWITTER_API_SECRET = "your_gibberish_twitter_api_secret";
// --------------------------------------------------------------------------------------------------------

// Only the following can be used for RX: 8, 9, 10, 11, 14 (MISO), 15 (SCK), 16 (MOSI).

// EMIC2 PINS
#define EMICrxPin 10    // EMIC2 SOUT
#define EMICtxPin 11    // EMIC2 SIN

// LCD PINS
#define LCDRSPin  9  // RS
#define LCDRWPin  8  // E

#define LCDD4Pin  7  // D4
#define LCDD5Pin  6   // D5
#define LCDD6Pin  5   // D6
#define LCDD7Pin  4   // D7

// Global Variables
bool firstRun = true;

// Setup our LCD
LiquidCrystal lcd(LCDRSPin, LCDRWPin, LCDD4Pin, LCDD5Pin, LCDD6Pin, LCDD7Pin); // rs, rw, d4, d5, d6, d7, d8

// Setup our Softare Serial for the EMIC2
SoftwareSerial emic =  SoftwareSerial(EMICrxPin, EMICtxPin);

void setup()
{
  // Setup Logging
  Serial.begin(9600); // Serial for feedback
  Serial.println(F("Start"));

  // Setup LCD
  lcd.begin(2, 16); // 2 lines x 16 chars
  // Update user!
  lcdTextTop(F("Warm up"));

  // Setup EMIC
  pinMode(EMICtxPin, OUTPUT);
  pinMode(EMICrxPin, INPUT);

  // Setup logging
  emic.begin(9600); // SoftwareSerial for EMIC

  // Wait until ready
  waitReady();

  // Initiate Twitter feed
  Bridge.begin();

  // Update user!
  lcdTextBottom(F("Ready."));

  // Setup EMIC
  maxVolume(); // Set our volume on the EMIC
  setVoice(0);  // Set our voice on the EMIC
}

void loop()  // Main code, to run repeatedly
{
  Serial.println(F("Go"));
  lcdClear();
  lcdTextTop(F("Checking"));
  lcdTextBottom(F("Twitter"));

  // Start our check on Twitter
  TembooChoreo HomeTimelineChoreo;
  HomeTimelineChoreo.begin();    // Invoke the Temboo client.

  // set Temboo account credentials
  HomeTimelineChoreo.setAccountName(TEMBOO_ACCOUNT);
  HomeTimelineChoreo.setAppKeyName(TEMBOO_APP_KEY_NAME);
  HomeTimelineChoreo.setAppKey(TEMBOO_APP_KEY);

  // tell the Temboo client which Choreo to run (Twitter > Timelines > HomeTimeline)
  HomeTimelineChoreo.setChoreo("/Library/Twitter/Timelines/HomeTimeline");

  // set the required choreo inputs, see https://www.temboo.com/library/Library/Twitter/Timelines/HomeTimeline/
  HomeTimelineChoreo.addInput(F("Count"),               F("1"));                  //String(TweetsMax)); // the max number of Tweets to return from each request
  HomeTimelineChoreo.addInput(F("AccessToken"),         TWITTER_ACCESS_TOKEN);
  HomeTimelineChoreo.addInput(F("AccessTokenSecret"),   TWITTER_ACCESS_TOKEN_SECRET);
  HomeTimelineChoreo.addInput(F("ConsumerKey"),         TWITTER_API_KEY);
  HomeTimelineChoreo.addInput(F("ConsumerSecret"),      TWITTER_API_SECRET);

  // next, we'll define two output filters that let us specify the elements of the response from Twitter that we want to receive see the examples at http://www.temboo.com/arduino
  HomeTimelineChoreo.addOutputFilter(F("tweet"), F("/[1]/text"), F("Response"));
  // and the name of the author
  HomeTimelineChoreo.addOutputFilter(F("author"), F("/[1]/user/screen_name"), F("Response"));

  //for (int i=1;i<=TweetsMax;i++) {
  //  //HomeTimelineChoreo.addOutputFilter(String(i+(outer*8)), "/["+String(i+(outer*8))+"]/user/screen_name", "Response");
  //  HomeTimelineChoreo.addOutputFilter("tweet", "/[" + String(i) + "]/text", "Response");
  //  HomeTimelineChoreo.addOutputFilter("author", "/[" + String(i) + "]/user/screen_name", "Response");
  //}

  unsigned int returnCode = HomeTimelineChoreo.run();

  if(returnCode == 0) { // a response code of 0 means success; print the API response

    String author; // a String to hold the tweet author's name
    String tweet; // a String to hold the text of the tweet

    while(HomeTimelineChoreo.available()) {

      // read the name of the output item
      String nam = HomeTimelineChoreo.readStringUntil('\x1F');
      nam.trim();

      // read the value of the output item
      String data = HomeTimelineChoreo.readStringUntil('\x1E');
      data.trim();
      Serial.println("N:" + nam + " D:" + data);

      // assign the value to the appropriate String
      if (nam == "tweet") {
        tweet = data;
      } else if (nam == "author") {
        author = data;
      }
    }
      // Serial.println("@" + author + " - " + tweet);
      // We have the Author and Tweet.  Lets send it to our talk box!!!

    if (author != "") {
      lcdClear();
      // Speak the name first...
      doText("From " + author);
      delay(250);
      // Speak the text
      lcdClear();
      doText("Said " + tweet);
      delay(250);
    }
      else
    {
      lcdClear();
      lcdTextTop(F("Empty"));
    }
  }
  else
  {
    // there was an error
    String inp;
    while(HomeTimelineChoreo.available()) {
      char c = HomeTimelineChoreo.read();
      //inp = inp + c;
      Serial.print(c);
    }
    Serial.println("");
    if (returnCode == 6) {
      doText(F("No Internet"));
    }
    else
    {
      doText(F("Error "));
      lcdTextBottom(String(returnCode));
    }
  }

  HomeTimelineChoreo.close();

  if (firstRun == true) {
    firstRun = false;
    sing();
  }
  else
  {
    Serial.print(F("[x"));
    delay(2500);
    Serial.print(F("x"));
    delay(2500);
    Serial.print(F("x"));
    delay(2500);
    Serial.print(F("x"));
    delay(2500);
    Serial.print(F("x"));
    delay(2500);
    Serial.println(F("x]"));
    delay(2500);
  }

  lcdClear();

  // Additional tests you can run to test the LCD and EMIC2:
  // voiceTest();
  // sing();
}

void lcdTextTop(String inp) {
//  Serial.print(F("Top LCD: "));
  //Serial.println(inp);
  lcd.setCursor(0,0);
  lcd.print(inp);
}

void lcdTextBottom(String inp) {
//  Serial.print(F("Bottom LCD: "));
  //Serial.println(inp);
  lcd.setCursor(0,1);
  lcd.print(inp);
}

void lcdClear() {
//   Serial.println(F("Clear."));
   lcd.clear();
}

void voiceTest() {
  for (int i = 0; i < 8; i++) {
    lcdClear();
    lcdTextTop(F("Voice "));
    lcdTextBottom(String(i));
    setVoice(i);
    doText(F("EXTERMINATE"));
    delay(100);
  }
}

void setVoice(int voice) {
  // 0 to 8, 0 Perfect Paul, 1 Huge Harry, 2 Beautiful Betty, 3 Uppity Ursula, 4 Doc Dennis, 5 Kit the Kid, 6 Frail the Frank, 7 Rough Rita, 8 Wispering Wendy

  // Set some hard limits
  if (voice < 0) { voice = 0; }
  if (voice > 8) { voice = 8; }

//  Serial.print(F("Voice@"));
//  Serial.println(voice);

  // Set voice EMIC2
  emic.print('N'); // Tell it we are picking a voice
  emic.print(voice); // send the voice we picked
  emic.print('\n');
  waitReply();

}

void waitReady() {
//  Serial.println(F("Getting ready."));
  emic.print('\n');             // Check if system online
  waitReply();
  //Serial.println(F("Ready."));
}

void maxVolume() {
//  Serial.println(F("Vol max."));
  // Set Volume EMIC2
  emic.print('V18'); // Range V-48 to V18
  emic.print('\n');
  waitReply();
}

void doText(String inp) {

  // Clean up the text
  inp.trim(); // Removes spaces
  lcdClear(); // Clears our LCD

  // Does it fit all on one line?
  if (inp.length() > 15) {

    // Show first 16 chars
    String topText = inp.substring(0,15);
    topText.trim();
    lcdTextTop(topText);

    // Show remaining chars
    String botText;

    if (inp.length() > 31) {
      botText = inp.substring(15,31);
    }
    else
    {
      botText = inp.substring(15,inp.length());
    }
    botText.trim();
    lcdTextBottom(botText);
  }
  else
  {
    // 16 Characters or less, we only need to show the top line
    lcdTextTop(inp);
  }

  // EMIC2
  // Cleanup the text again for EMIC
  inp.replace(F("http://"), F("site "));
  inp.replace(F("@"), F("user "));
  inp.replace(F("#"), F("hashtag "));
  inp.replace(F("RT "), F("re tweet "));
  inp.replace(F("\""), F("quote "));
  inp.replace(F(":"),F(" "));
  inp.replace(F("â"),F(" "));

  emic.print('S');
  emic.print(inp); // send text
  emic.print('\n');
  waitReply();
}

void sing(){
//  Serial.println(F("Singing."));
  // LCD
  lcdClear();
  lcdTextTop(F("Daisy..."));
  // EMIC
  emic.print("D1\n");
  waitReply();
}

void waitReply(){
//  Serial.println(F("Waiting ready."));
  while (emic.read() != ':');   // Wait for : meanin ready
  delay(30);                   // Add delay
  emic.flush();                 // Flush the receive buffer
}
Get it on GitHub!
Troubleshooting
There are a lot of possible errors. I’ve left Serial Debugging for errors so you can trace them out. But if it complains about anything missing (security, missing keys etc) or if it doesn’t read out a full tweet – means it is running out of memory. Enclose your strings in F(), reduce strings, comment out Serial commands. You can remove the LCD section of the code. Or do all kinds of magic to stretch this out ![]() . But 9 times out of 10, if you get an error you can’t figure out, it is a memory limit.
. But 9 times out of 10, if you get an error you can’t figure out, it is a memory limit.
Thank You for Reading
That’s it! The next time we cover the EMIC 2 we will be adding a voice-to-text recognition module and expanding on what was covered in this article ![]()
Thanks for reading and have fun hacking stuff together.
