Have you ever hooked something up to power … and noticed it either smoking or a strange pop followed by silence or a broken device? The most common cause is too high of a voltage. Every component on your electronic devices can only handle voltages up to a certain point. I’m going to show you a simple formula to calculate the required resistor values when working with Arduino.
What are Resistors Used For?
Resistors make sure that your power source only sends a small amount of voltage to a smaller device. It makes sure that your 5v, 500mA Arduino pin doesn’t burn out an LED that requires 2v and 20mA for example. It limits current flow. This has other consequences as well, if you split your voltage in multiple directions, it will tend to follow the path of least resistance, changing how the resistor behaves in parallel. Resistors can also be used in sequence to add additional resistance (so two 110 ohm resistors can be daisy chained to roughly replace a 220 ohm resistor).
But in order to know what strength of resistor we need, we have to find our voltage and current information first!
Finding Important Information from Specification Sheets
Arduino’s typically put out 5V. However some put out 3.3V, and most devices have the ability to supply power at both 5V and 3.3V which can impact the resistor size you choose to use. To do these calculations you need to find out the Forward Voltage and Max Current.
For an LED for example, its likely to be 2 or 3V for the forward voltage and 20mA. Just remember the formula below uses amps (there are 1,000 mA in an amp).
Formulas
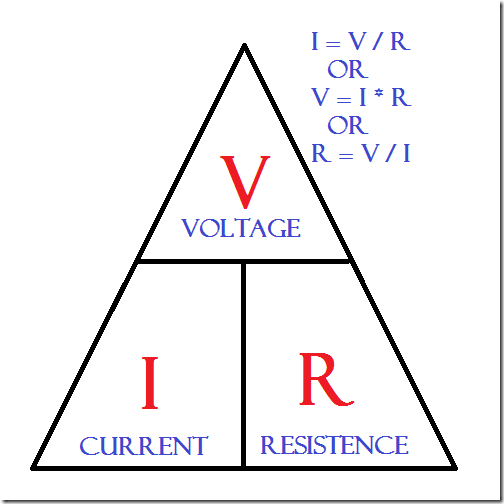
The main formula we are going to rely on is below:
The one we particularly care about is Resistance = Voltage (Source – Forward) / Max Current in Amps. This tells us what our minimum size of resistor needs to be without damaging the LED!
You should always buffer this number as voltage is rarely consistent.
Finding the Right Size of Resistor
So, using the specifications sheet we can determine what the LED (or any component really) requires to operate. In the case of an LED, it may be a forward voltage of 2V. And a maximum current of 20mA. Well, in order for us to calculate the resistance, we need to do a small formula.
Known:
- Arduino is 5V
- Forward Voltage is 2V
- Max Resistance is 20 mA
Which translates to:
R = (Arduino 5V – Forward Voltage 2V) / (Max Resistance of 20 mA as amps)
R = (5-2) / (0.020)
R = 150 ohm resistor required, but as a best practice, 200 ohm would be better.
But how do we determine if a resistor is 150 ohm? It isn’t labeled anywhere. Well, the easiest is probably to use a resistor calculator, or to print out a simple resistor chart. The coloured bands determine the important factors of the resistor.
Common ‘Safe’ Resistor Sizes for Applications
Typically 330 ohms is a safe resistor size for LED’s when working with Arduino. However, super bright LED’s tend to handle 150 ohm quite easily. When working with 3 or more LED’s, no resistor is typically required.
However, the only way to determine a safe resistor size is to use the calculation above or find out from the manufacturer. Remember that resistance requirements depend on your device voltage as well. So the size of resistor required for a 3.3V Arduino is different than a 5V.
Related Articles:


4 thoughts on “Arduino – Calculating Required Resistor Values”